
- V.2.1.0 (16 May 2025) - Added support for all social media icons (threads, x, mastodon, etc.) - 100 Score for Google Page Speed Test Tool (premium themes only) - Added Nofollow tag to labels /search URL (stop irrelevant signals) - Alt tag for author profile image fixed - Added new Schema tag for pages to better ranking (test with rich results) - H1 tag issue fixed posts, pages, including the homepage - New JS stylesheet for fonts and icons updated - SEO score improved for the Lighthouse test - Fixed featured post titles cut out in some languages - Use of the Theme Designer webpage lock fixed - Footer copyright is now flexible to handle long information - Minor colours, heights, forms and buttons fixed - V.2.0.0 (27 September 2024) - Fix large text submenu words overlapping - Fix hiding author name and photo blogger settings - H1 tag issue for "Page Speed Test" has been fixed - Blank image from Layout now works all over sections - Fixed hiding a section completely does not work in some sections - Lazy Load and Native Feed improvements for speed - Minor bugs fixed, aligment and list buttons - V.1.9.0 (19 November 2023) - Customize "Related Posts" from Layout easily - Sticky Sidebar/Menu options moved to Theme Designer - Added New Posts Ads Shortcode becomes flexible and easy to set up - Minimize theme coding into less code and faster loading - Free Versions are also updated with fewer features - Better automatic website translation from multiple languages - Speed Enhancement and Minor Bugs Fixed - Box Mode added into Theme Designer - Hide/Disable In-Articles ads from particular posts/pages easily - Enable Automatic Ads from the Top and Bottom Pages from the Layout - Multiple type "Comments Box" support more flexibility - Simple setup and more features check our documentation - Optional Update (24 September 2023) — Added: New Twitter logo “X” is now supported — Updated: Default Twitter logo updated to “X” - V.1.8.0 (05 September 2023) - Fixed "random" shortcode not showing random posts - PostCard shortcode now supports random post - More Fonts support from blogger 'Theme Designer" section - V.1.7.0 (01 July 2023) - Posts speed 92+ in Google Page Test - Fixed Posts low speed improvements - Reduce Template size and fast loading - Fixed table CSS and optimized javascript - Reduce comment section rendering faster - Same Version (01 May 2023) - Optional Update - Fixed Post author hide/show from layout - New Flexible look layout - Fixed Archive List widget section - Little Minor Bugs Fixed - V.1.6.0 (08 January 2023) - Added Post Cards - Added Post Split (Content Pagination) - Added Native Feed System - Added Awesome Ajax Search - Added Unlimited Ads Placements - Core Web Vitals Fixed - Eliminated Blogger Feed - V.1.2.0 to V.1.5.0 (13 May 2022) - Fixed comment box error due to blogger new update - Fixed youtube thumbnail error - Fixed megamenu down arrow in mobile view - Fixed optional use of dark logo - Fixed comment alert message from setting - Fixed minor bugs - V.1.0.0 (23 January 2022) - Initial Stage Release - Update Download Featured section

Header Logo:
Open Layout > then click on Edit Icon > in the Header Logo gadget. Example:
For Dark Logo: You can upload dark logo easily, first of all upload dark image in post and copy img source link and then paste in link box as shown in above image.
Header Menu:
Open Layout > then Click on Edit Icon > in the Header Menu gadget.Default and Sub Menu Links
Main Default Menu Example = Features - Default menu example.Single Sub Menu Example = _Sub Menu 1 - Just add 1 underscore before title.
Double Sub Menu Example = __Sub Menu 2 - Just add 2 underscore before title.
Example:

Note: Remember Sub Menu 1 should be under Sub Menu 2 List.
Menu Icons
You can select hundreds of amazing icons for your menu link because this template uses Google Material Icons as its primary icon source.Icon Code: <i class="bi bi-0-circle"></i>
How to get HTML Code? Step 1 – Go to the Google Material Icons Gallery.
Step 2 – Find the icon you're looking for and tap on it to access the relevant information page.
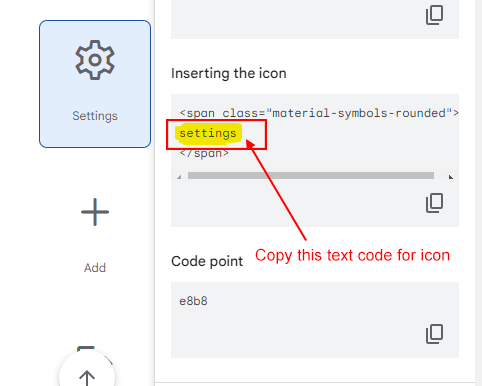
Step 3 – Retrieve the Icon Font Code from the Google Material Icons Gallery, as demonstrated in the image provided.

Step 4 – Edit the link text by adding the Icon Font Code as in the example below.

Mega Menu
For recent posts = megamenu/recentFor random posts = megamenu/random
For specific label = megamenu/Your Label
The Label should be exactly as given in posts likewise Lowercase or Uppercase.
What are Labels in Blogger?

Example:

Note: Remember that Mega Menu cannot be used in Sub Menu list.
Featured Posts Section:
Open Layout > then click on Edit Icon > in the Featured Posts Section gadget then Add/Customize a HTML/Javascript or Popular Posts > in the Featured Posts Section.HTML/Javascript
Example:
Customize Featured Posts and adjust title and number of posts along with custom label support to show posts at Featured Section.
Shortcode Recent Posts Example: featured/recent
Shortcode Random Posts Example: featured/random
Shortcode Label Posts Example: featured/Your Label
Note: Use labels name same exact as in posts either in Lowercase or Uppercase.
Popular Posts
Example:
Content Blocks Section:
Open Layout > then click on Edit Icon > in the Content Blocks Section gadget then Add/Customize a HTML/Javascript > in the Content Blocks Section. Example:
Customize Content Blocks and adjust title and number of posts along with custom label support to show posts at Content Blocks Section.
Shortcode Label Posts Example: Number of Results / Block Type / Your Label
Remember that, Number of Results should be used only if it is supported by below Block Types shortcodes.
Block Types
Block-1 Shortcode Example: block1/recentBlock-2 Shortcode Example: block2/recent
Grid-1 Shortcode Example: 6/grid1/recent
Video Shortcode Example: video/recent
Customize above shortcode to change its label type just like recent, random, Your Label also you can change number of results only if it is supported by above Block Types shortcode.
Note: Use labels name same exact as in posts either in Lowercase or Uppercase.
Main Recent Posts:
Open Layout > then click on Edit Icon > in the Main Recent Posts (section) gadget. Example:
Hide Posts title
Shortcode Example: (hide)Use the shortcode (hide) in Read More box to hide main title as shown in above image.
Comment System
The New Comment system allows you to setup the comments from Blog Posts section. To Access Blogger Comment system go to Layout > Blog Posts > Comment FormatExample:

Blogger Shortcode: #type=(blogger)
Disqus Shortcode: #type=(disqus) #shortname=(Your Shortname)
Facebook Shortcode: #type=(facebook)
Facebook Custom Language Shortcode: #type=(facebook) #lang=(Your Language Code)
Facebook Custom Language Codes: en_US, es_ES, ar_AR, id_ID, th_TH, de_DE, ga_GA, it_IT, ne_NE, ja_JA, vi_VN, pt_BR, fr_FR, ru_RU, de_DE, it_IT
Additional Languages: To utilize other languages, it's important to confirm if Facebook supports them (Facebook Languages).
Embed Media in Blogger Comments
Publish any image or video in comments section directly without any shortcode, just copy and paste the image or video link in comment box.Example:

Customize Post Labels
Customize Labels title easily also you can hide them by turning off them. To Access Labels go to Layout > Blog Posts > Labels PrefixExample:

Customize Author
Customize Author prefix (like "Posted By") easily also you can hide Author name by turning it off. To Access Author Format go to Layout > Blog Posts > Author FormatExample:

Customize Date
Customize Date Format easily also you can hide published date of articles by turning off them. To Access Date Format go to Layout > Blog Posts > Date FormatExample:

Related Posts:
Open Layout > then click on Edit Icon > in the Related Posts gadget. Example:
Customize Related Posts and adjust title and number of posts along with custom label support to show posts at the end of article.
Shortcode Default Posts Example: 3/related/default
Shortcode Recent Posts Example: 3/related/recent
Shortcode Random Posts Example: 3/related/random
Shortcode Label Posts Example: 3/related/Your Label
The default attribute shows posts matching with current post automatically.
Ad Code for Posts/Pages:
Open Layout > then click on Edit Icon > in the Ad Code for Posts/Pages gadget. Example:
Put your ad code into this widget to show automatic ads in Top and Bottom of the article.
Custom Ads Shortcode
Open Post > then Choose area in Post > and paste ShortCode.Shortcode Example: (ads)

By using (ads) shortcode you can implement ads between the article paragraph in desired place.
Note: (ads) shortcode only works if you have added ad code into "Ad Code for Posts/Pages" Section.
Hide Ads
If you want to hide ad from specific Post just use below shortcode.Shortcode Example: (hideAds)
Benefits: Using ads with help of shortcode, gives you a powerful control to turn off ads at anytime from all posts also when you found scammers fake click activity or something else need to change ads from all posts at once with the help of these widegts.
Post Cards:
This Post Card option works in Pages and Posts both you can use the shortcode to implement post card easilyShortcode: (getCard) #type=(Card Type) #title=(Card Title) #info=(Card Info) #button=(Card Text) #icon=(Icon Code)
Shortcode: post, download, product, custom
Example:
These Post Cards are super flexible even works with optional usage of any value with easy integration.
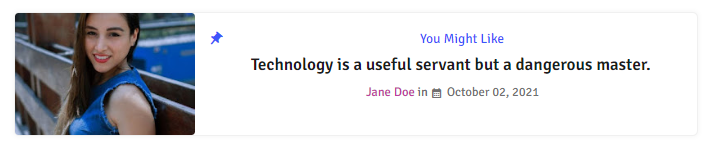
Post Type Card
Shortcode: (getCard) #type=(post) #title=(You might Like)Card Link: No Need to enter post link just type # or / anything in place of link box.
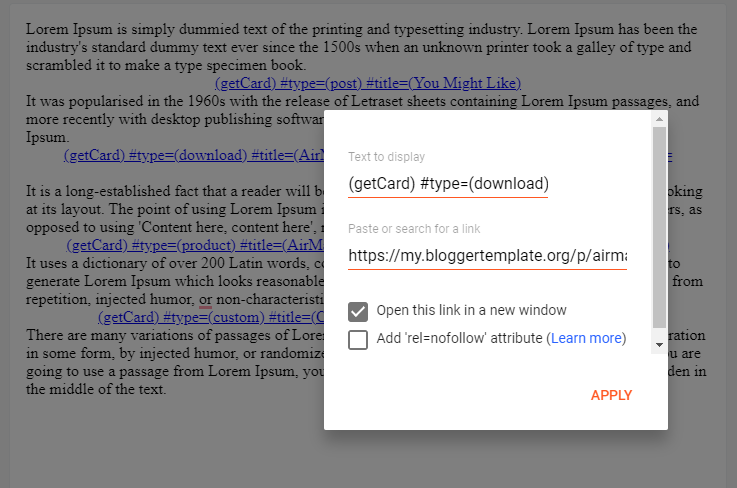
Download Type Card
Shortcode: (getCard) #type=(download) #title=(GridMag_Blogger_template.zip) #info=(74.02kb) #button=(Download)Card Link: Use any link with open new window optional feature tick mark if needed.

Buy Type Card
Shortcode: (getCard) #type=(product) #title=(GridMag Premium Template) #info=(09.95$) #button=(Buy)Card Link: Use any link with open new window optional feature tick mark if needed.

Custom Type Card
Shortcode: (getCard) #type=(custom) #title=(Custom Post Card) #info=(Info) #button=(Button) #icon=(download)Card Link: Use any link with open new window optional feature tick mark if needed.

Icon Code: This template use Bootstrap icons you can get all type icons according to your need and requirement, please go to here Google Material Icons and search icons.
Step 1: Go to Google Material Icons
Step 2: Search the icon from top search box and find that icons which you want click on that.
Step 3: Now just copy the icon code from right sidebar as shown in below example
For More buttons and shortcodes installation please visit this page here
Note: Please copy icon code carefully to put inside button.
Post Split (Content Pagination):
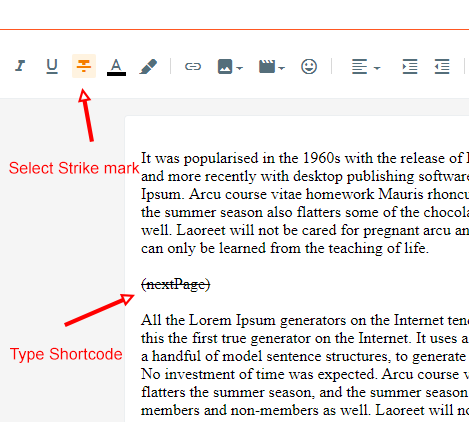
With the help of this amazing post-split tool, you can easily divide the post into different paragraphs with buttons for pagination. Just repeat the shortcode after different paragraphs like below.Shortcode Example: (nextPage)
Example:
Note: You can also use Post Card inside the Post Split Paragraphs.
Post-Author Social icons:
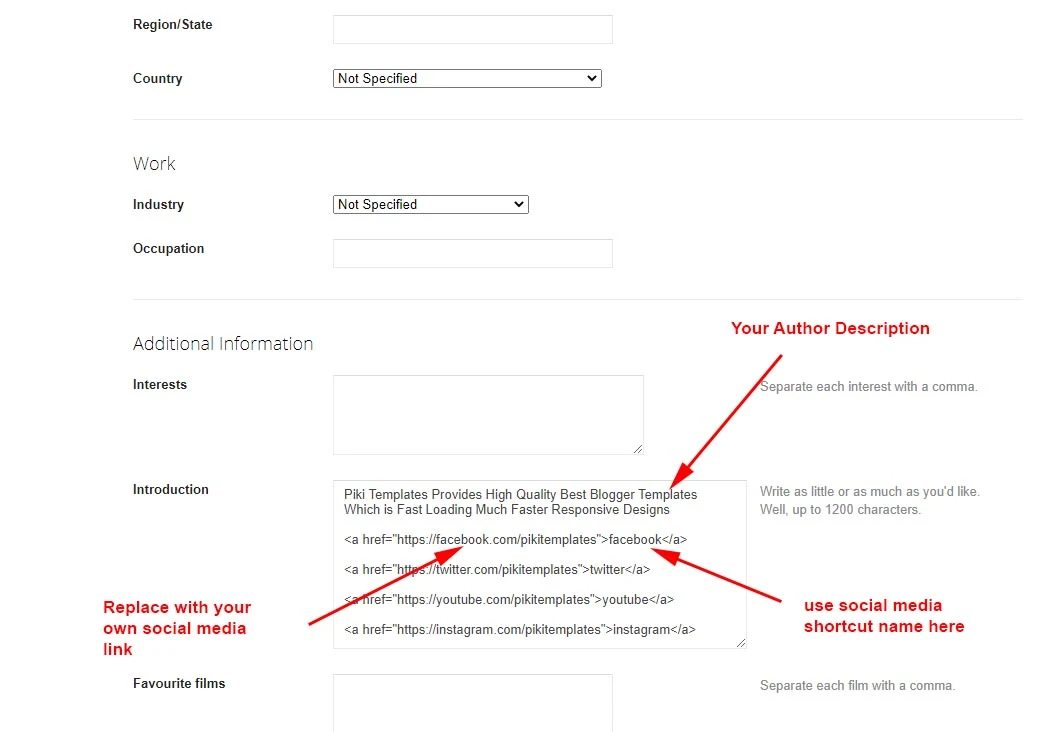
Open Blogger Setting > then Choose Edit Blogger Profile > and paste ShortCode. Example:
You can create this Blogger Profile easily by following below steps that we provide here, Go to Blogger Click on Setting then at last click on edit profile put the code that we provide below Example:

After editing, Blogger Author Profile Copy the code that we provide and paste in your blogger profile and replace social media links with your own pages links that you want to use. Example:
Profile Social Media Links
Shortcode Example:<a href="https://instagram.com/pikitemplates">instagram</a>
This code can be used to shows social media icons along with link under your profile.
Add this Short code :
Hello this is Jane Doe, I am Web Designer and Expert at Piki Templates
<a href="https://facebook.com/pikitemplates">facebook</a>
<a href="https://twitter.com/pikitemplates">twitter</a>
<a href="https://youtube.com/pikitemplates">youtube</a>
<a href="https://instagram.com/pikitemplates">instagram</a>
<a href="https://www.pikitemplates.com/">external-link</a>
Hide Author Bio
You can hide Author Section by turning off from below button. To Access Hide Author Section go to Layout > Blog Posts > Show Author ProfileExample:

Note: Replace the links with your own social media links to show in author section.
Facebook Page Like Button:
Open Layout > then click on Edit a Gadget Main Recent Posts > in Blog Posts. Example:
Remember: To add custom "Facebook Sidebar Like Button Box" you have to set first set comment system as facebook after that go to Facebook Like Button website copy code and paste into Sidebar new widget HTML/Javascript. Then facebook page like box works if anybody wants to add Facebook Page Like Page, its an optional feature.
Sidebar Section:
Open Layout > then click on Edit Icon > in the Social Widget (section) gadget. Example:
Here you can add a social media link in your sidebar by using shortcut code in LinkList Gadget as shown in the above image
Supported Social Media icons: blogger, facebook, twitter-x, youtube, messenger, snapchat, telegram, instagram, pinterest, google, apple, microsoft, dribbble, linkedin, tiktok, stumbleupon, vk, stack-overflow, github, soundcloud, behance, digg, delicious, codepen, flipboard, reddit, tumblr, twitch, rss, skype, whatsapp, discord
Social Icons: This template support various social icons you can use as per your requirement, use only Lowercase characters.
Custom Subscription Box:
Open Layout > then click on Edit Icon > in the Follow by Email gadget. Example: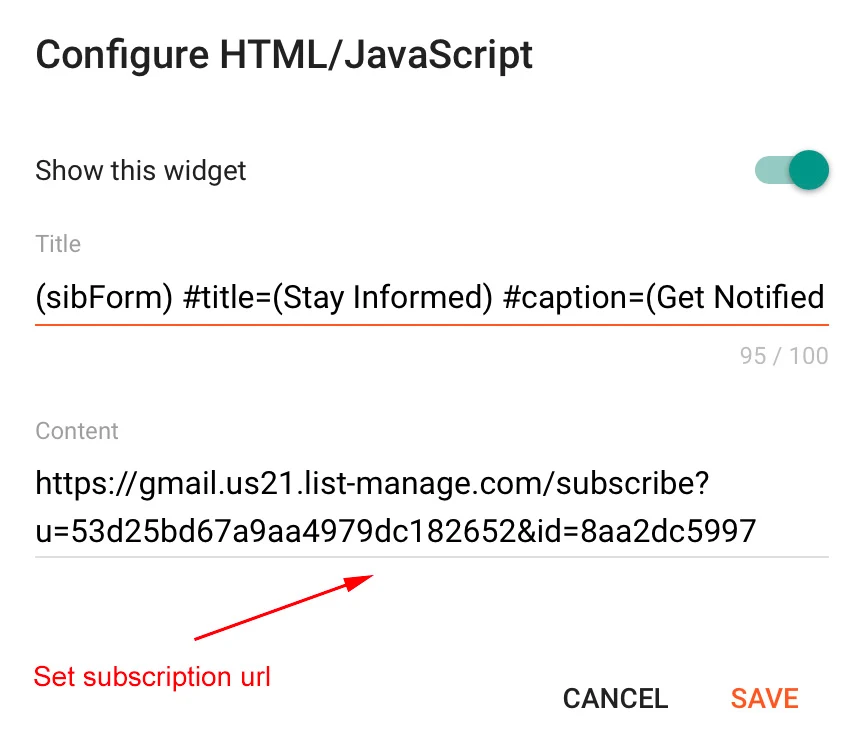
Use Custom Subscription Email Box easily with Third Party Platforms like Brevo, Mailchimp. Just paste your subscription form link and done.
Custom Shortcode:
Custom Subscription Box shortcode = (sibForm)Title shortcode = #title=(Follow by Email)
Caption shortcode = #caption=(Get Notified About Next Update Direct to Your inbox)
Use of title and caption shortcode is an optional feature.
Create Subscription Form Link
To Create a Custom Subscription Form Link follow steps in below article.- Subscription Link: How to create custom Subscription Link?
Note: Remember to replace our default demo subscription link with your own subscription link.
Sidebar Posts Section:
Open Layout > then click on Edit Icon > in the Sidebar Posts Section gadget. Example:
Customize Sidebar Posts and adjust title and number of posts along with custom label support to show posts at sidebar section.
Shortcode Recent Posts Example: 3/sidebar/recent
Shortcode Random Posts Example: 3/sidebar/random
Shortcode Label Posts Example: 3/sidebar/Your Label
Note: Use labels name same exact as in posts either in Lowercase or Uppercase.
Sidebar Comments Section:
Open Layout > then click on Edit Icon > in the Comments Section gadget. Example:
To display recent comments on your website, use shortcode as shown in the above image also you can adjust the number of comments easily.
Footer Social Media:
Open Layout > then click on Edit Icon > in the Footer Section Example:Here you can add a social media link in your footer section by using shortcut code in LinkList Gadget as shown in the above image
Supported Social Media icons: blogger, facebook, twitter-x, youtube, messenger, snapchat, telegram, instagram, pinterest, google, apple, microsoft, dribbble, linkedin, tiktok, stumbleupon, vk, stack-overflow, github, soundcloud, behance, digg, delicious, codepen, flipboard, reddit, tumblr, twitch, rss, skype, whatsapp, discord
Social Icons: This template support various social icons you can use as per your requirement, use only Lowercase characters.
Footer Menu:
Open Layout > then click on Edit Icon > in the Footer Menu Example:
Here you can insert your page's links to show at bottom of the template as shown in the above image.
Footer Copyright:
Open Layout > then click on Edit Icon > in the Footer Copyright Example:
Here you can insert your website footer credit link but only for premium users's free users are not able to remove and edit our website link at the footer.
Note: Only premium users can edit and add footer website link.
Cookies Consent:
Open Layout > then click on Edit Icon > in the Cookies Consent Example:
Cookies consent is an advanced plugin system, where you can set Cookies to expire days so that it will store some bytes of data in users device so that next time when your visitor revisit again to your website it loads faster and gives an enhanced user experience.
Use below shortcut code: Change Button Text = #buttons=(Accepted !)
Change Number of days = #days=(20)
Note: Use this shortcode correctly as we provided here, you can adjust cookies expiry's date popup.
Layout Options:
Open Blogger Dashboard > Tap on Theme then Go to Customize.This Blogger Template support Boxed Mode, Sticky Header, Sticky Sidebar, Native Dark Mode features.
You can set 1 or 0 to enable or disable those features.
Example:

Json Variables:
Open Layout > then click on Edit Icon > in the Json VariablesThis Blogger Template support Json Variables where you can set number of posts that should displayed in "Load More" button, also you can set number of numbering pagination in "Load More" button.
Example:

Feed Settings:
Open Blogger Dashboard > Tap on Settings then Scroll to Site Feed.This Blogger Template support Short Feed System, please set to short mode for better speed and enhancement with security purpose to safe control your content.
Turning on Short Feed System theme will load less data from blogger feed, which helps to increase your blogger website speed. Remember this option works on our latest templates only.
Example:
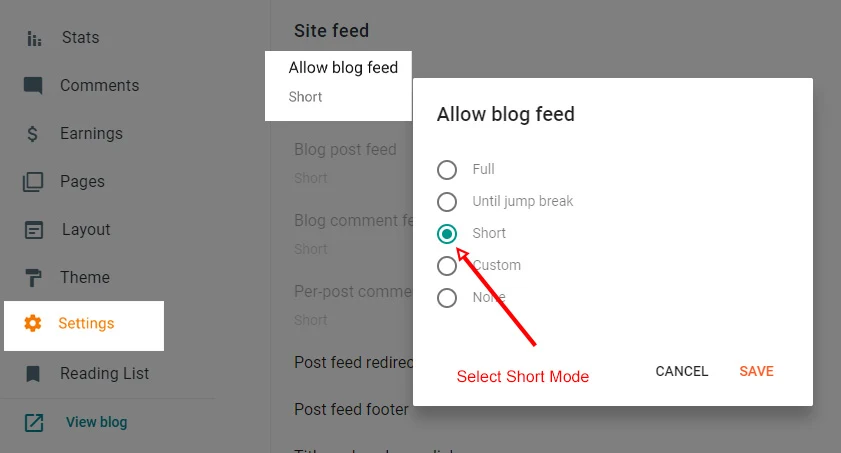
Note: Please do not disable/off blogger feed system because this will affect your comments section and featured posts section. Its Recommend that you should trun on Short Feed.
Customize Mag Paper Template
Open Theme > then click on Customize and explore Background Colorsand Advance option.Fully Customizable: Edit Font Styles, Menu Colors, Widgets Colors, Footer Section and much more options.
Example:
