
- V.1.1.0 (16 May 2025) - Added support for all social media icons (threads, x, mastodon, etc.) - 100 Score for Google Page Speed Test Tool (premium themes only) - Added Nofollow tag to labels /search URL (stop irrelevant signals) - Alt tag for author profile image fixed - Added new Schema tag for pages to better ranking (test with rich results) - H1 tag issue fixed posts, pages, including the homepage - New JS stylesheet for fonts and icons updated - SEO score improved for the Lighthouse test - Fixed featured post titles cut out in some languages - Use of the Theme Designer webpage lock fixed - Footer copyright is now flexible to handle long information - Minor colours, heights, forms and buttons fixed - V.1.0.0 (08 April 2021) - Initial Stage Release - Update Smooth Animations

- Download - Missile Blogger Template - Download/Preview
How to Change FontAwesome Icons in Templates?
Get FontAwesome Icons Short Codes Visit Here. All the ShortCodes of Icons you can copy and use in below Link Boxes like Example : <i class="far fa-arrow-alt-circle-down"></i> Example:
Admin Control Panel:
To edit or handle the blog posts, comments system, no. of posts, fixed menu, Facebook SDK plugin, etc. These Options Can be Controlled from Layout in Blogger Dashboard.Facebook SDK (Plugin):
Here you can use this gadget to install the Facebook comment box and Facebook page in the sidebar. For More Click Here.Example of Facebook:

Note: Below in details, all important steps provided for setup Facebook Comments System/Facebook Page on sidebar
Default Variables/Comments:
Open Layout > then click on Edit Icon > in the Default Variables gadget.Example:

Example to set Disqus Comment box:

Use below shortcut code: commentsSystem = facebook or disqus or blogger
disqusShortname = pikitemplates
noThumb = image url
You can use Disqus comment box a optional feature of our template, Just go to disqus.com create account after that tap on Get Started and follow "I Want to install Disqus on my Site" as shown in above image how to setup shortname for disqus. That's done just change blogger comment system and use disqus comments pluign easily Example of Disqus Comment:

Note: Many Users Facing Problem adding Disqus Comment Box make sure you
have added website link and created profile short name in Disqus.
Related Posts/ Show Texts:
Open Layout > then click on Edit Icon > in the Related Posts/ Email text gadget. Example:
Example of Related Posts:

relatedPostsNum = 3 - you can set number of Related Posts
loadMorePosts = Load More - you can change Load More Homepage button text
Example of Load More text:

Note: Use only Lowercase(small letters) letter in shortcode as display in above image.
Lazy Scrolls/ More Text:
Open Layout > then click on Edit Icon > in the Lazy Scrolls/ More Text gadget. Example:
fixedMenu = true or false - you change sticky menu fixed to scrolled
showMoreText = Show More - you can easily change Show More text in Featured Posts
Note: Use only Lowercase(small letters) letter in shortcode as display in above image.
Main Logo:
Open Layout > then click on Edit Icon > in the Main Logo (Header) gadget.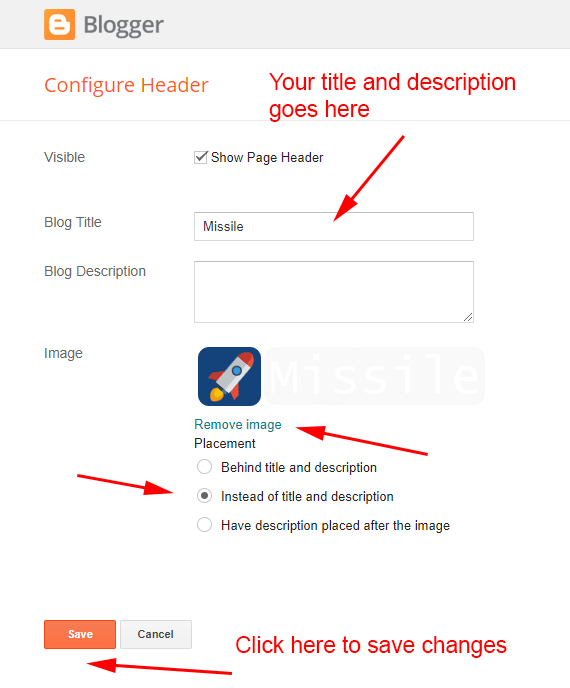
Note:- Use optimised image in your head logo to enhance website speed
.
Homepage Menu :- Open Layout > then click on Edit Icon > in the Homepage Menu gadget.
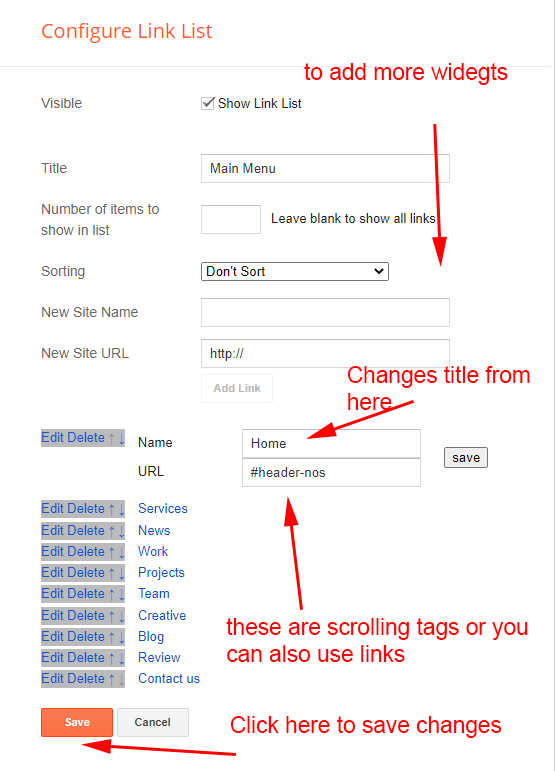
All the Homepage menu items can be edit and can be changed properly above the image is provided you to understand properly.
This will helps to scroll the menu in all listed elements on Homepage easily with the of these id's like #header-nos. We have pre installed these id's within template Not only this you can also use Link to show here as per your choice.
Main Menu:
Open Layout > then click on Edit Icon > in the Main Menu gadget.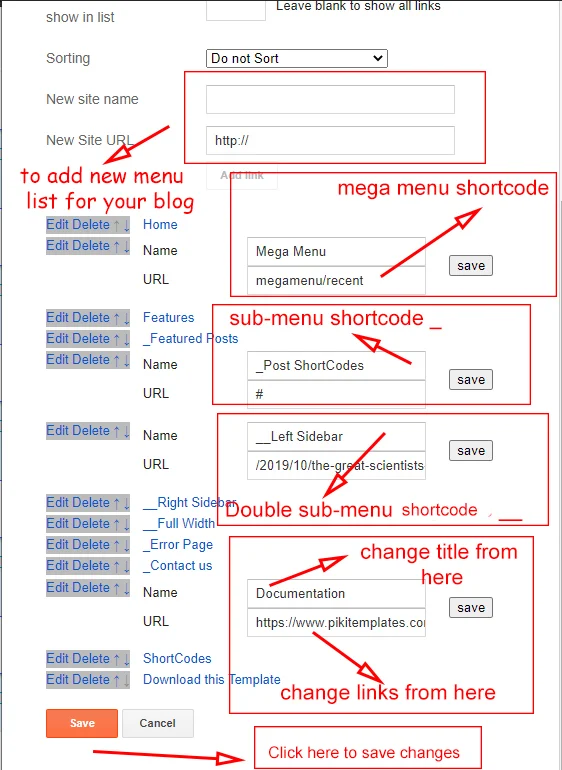
All the main menu items can be edit and can be changed properly above the image is provided you to understand properly.
To Create Mega Menu use Code
1:- For Recent Posts in Mega Menu
Use Shortcut Code :-
Happy Life (in First Box)
megamenu/recent (in Second Box)
2 :- For Label Posts in Mega Menu
Use Shortcut Code :-
Happy Life (in First Box)
megamenu/Happy Life (in Second Box)
Make Sure Use megamenu/Happy Life in 2nd Box. where Happy Life is a Example Label
To Create submenu use one underscore tab ( _submenu)
To Create more merging submenu use double underscore tab ( __submenu)
Use Shortcut Code :-
Happy Life (in First Box)
megamenu/Happy Life (in Second Box)
Make Sure Use megamenu/Happy Life in 2nd Box. where Happy Life is a Example Label
To Create submenu use one underscore tab ( _submenu)
To Create more merging submenu use double underscore tab ( __submenu)
Note:- Use shortcut code correctly to make working menu functions
.
Main Banner:
- Open Layout > then click on Edit Icon > in the Main Banner (section) gadget.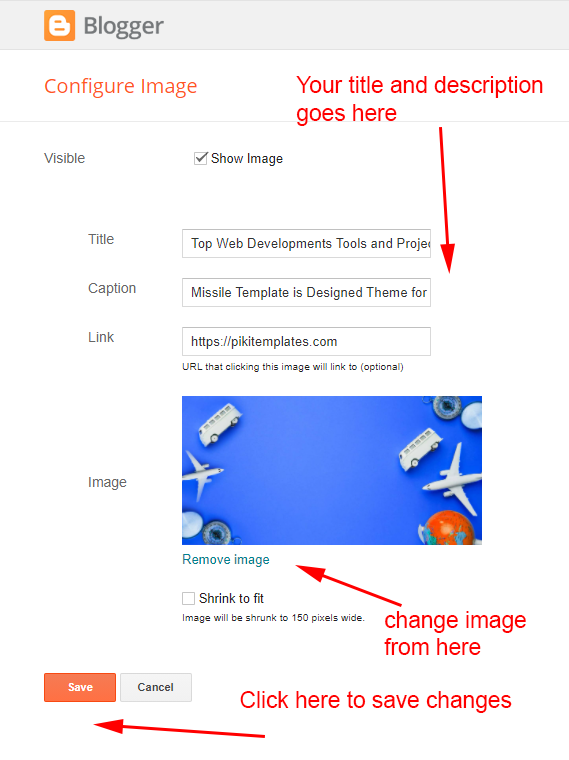
Note:- All the Shortcut Codes Already installed and Provided with Template .
Service Box Title:
- Open Layout > then click on Edit Icon > in the Service Box Title (section) gadget.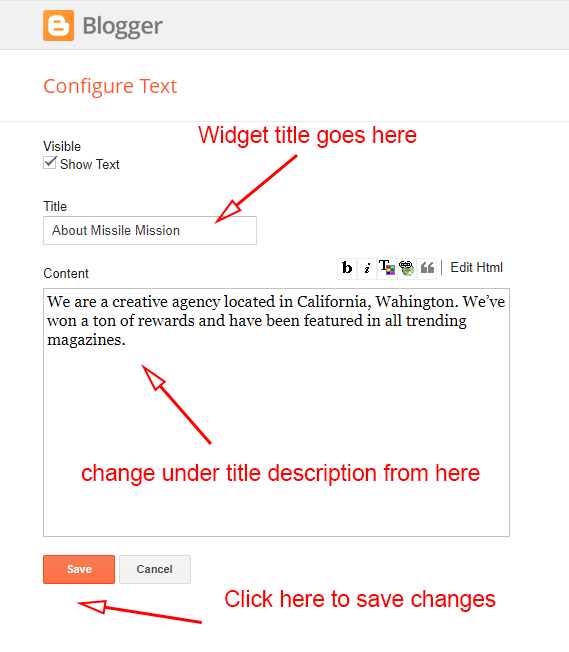
Note:- All the Shortcut Codes Already installed and Provided with Template .
Service Box:
- Open Layout > then click on Edit Icon > in the Service Box (section) gadget.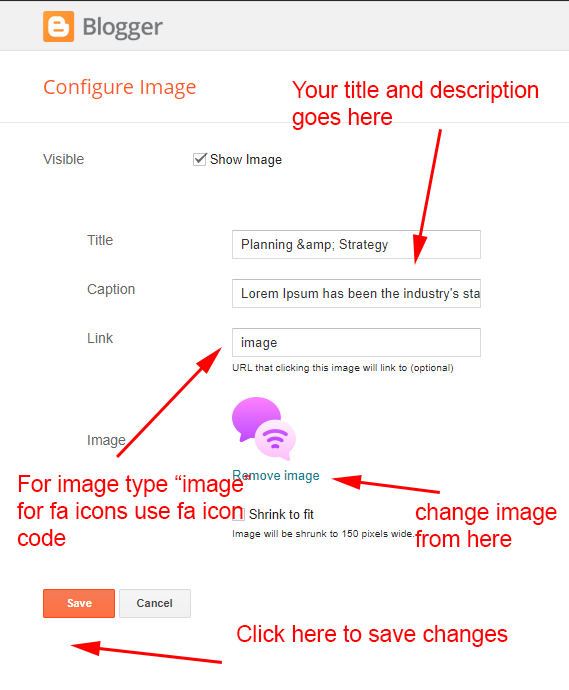
Go the Link to Select Font Awesome Icon Code and use it on your blog
Here you can select Font Awesome Icon code to show like fa-asterisk paste in link box above in place of image.
If You can want to Use only image then put image text in link tag.
Title and description can be Change from title and caption boxes above.
Note:- All the Shortcut Codes Already installed and Provided with Template .
News Panel:
- Open Layout > then click on Edit Icon > in the News Panel (section) gadget.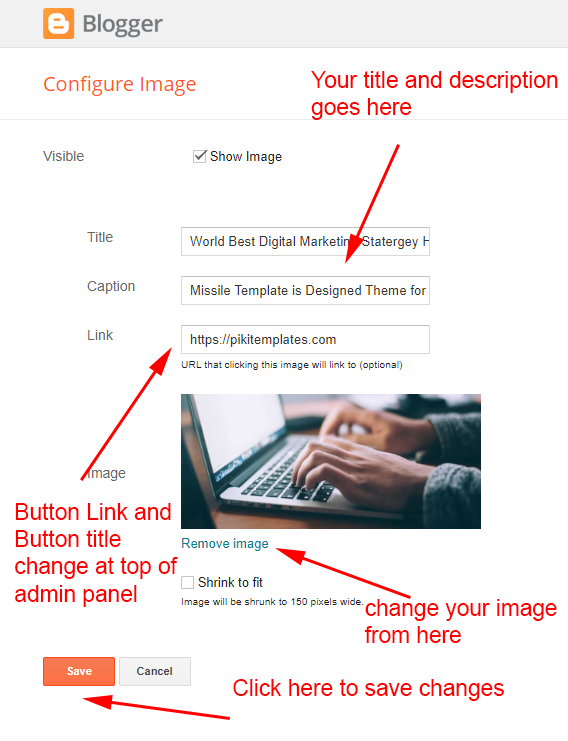
Note:- All the Shortcut Codes Already installed and Provided with Template .
Project Box Posts:
- Open Layout > then click on Edit Icon > in the Project Box Posts (section) gadget.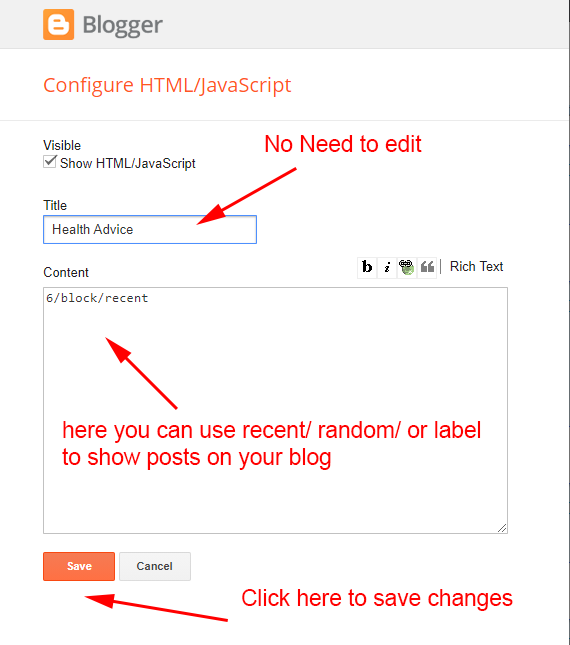
Here you can use this section to display Responsive Feature with both label and Recent Shortcut Code
For Featured Recent Posts :-
Use this Shortcut Code
6/block/recent
For Featured Label Posts :-
Use this Shortcut Code
For Featured Label Posts :-
Use this Shortcut Code
6/block/Your Label
Just Put label = recent or label = Happy Life to display Feature Posts
and type of shortcode is type = block
Note:- All the Shortcut Codes Already installed and Provided with Template .
Completed Projects Data:
- Open Layout > then click on Edit Icon > in the Completed Projets Data (section) gadget.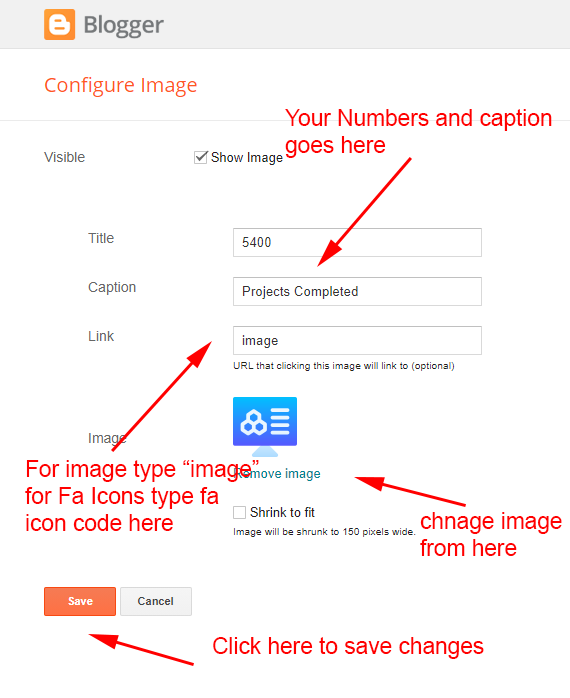
Here you can use this section to display Responsive Main Banner Image with help of LinkList Widget Easily also you can use your own custom image and Font Awesome 5 Free Codes.
Go the Link to Select Font Awesome Icon Code and use it on your blog
Here you can select Font Awesome Icon code to show like fa-asterisk paste in link box above in place of image.
If You can want to Use only image then put image text in link tag.
Title and description can be Change from title and caption boxes above.
Note:- All the Shortcut Codes Already installed and Provided with Template .
Our Team Boxes:
- Open Layout > then click on Edit Icon > in the Our Team Boxes (section) gadget.
No need to edit link button its disabled by default
Note:- All the Shortcut Codes Already installed and Provided with Template .
Scroll Panel:
- Open Layout > then click on Edit Icon > in the Scroll Panel (section) gadget.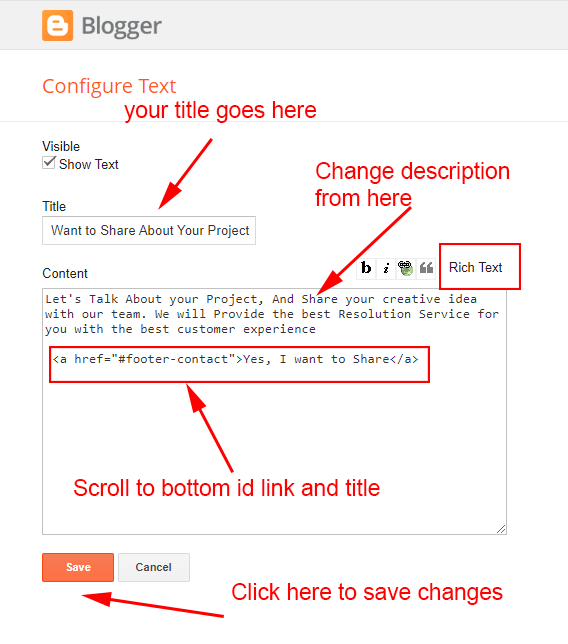
you can replace and change the text easily from here
Note:- All the Shortcut Codes Already installed and Provided with Template .
Top Services Box:
- Open Layout > then click on Edit Icon > in the Service Box (section) gadget.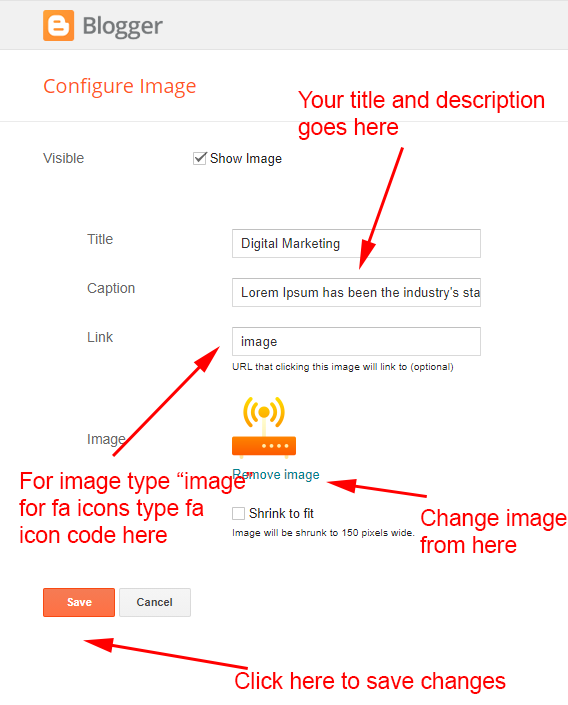
Go the Link to Select Font Awesome Icon Code and use it on your blog
Here you can select Font Awesome Icon code to show like fa-asterisk paste in link box above in place of image.
If You can want to Use only image then put image text in link tag.
Title and description can be Change from title and caption boxes above.
Note:- All the Shortcut Codes Already installed and Provided with Template .
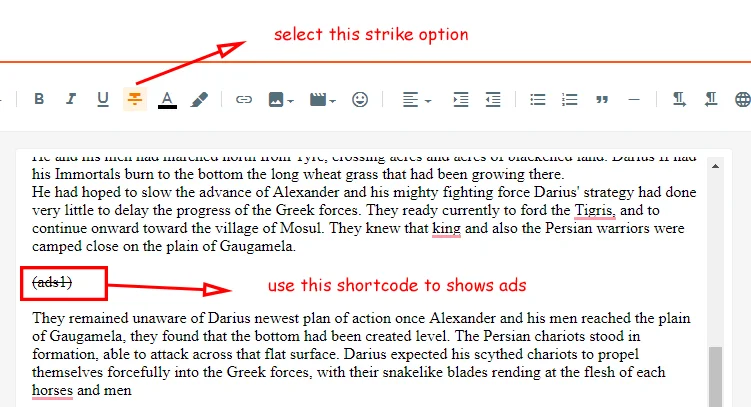
Inside Posts Ads:
- Open Layout > then click on Edit Icon > in the Top / Bottom Posts Ad (section) gadget.
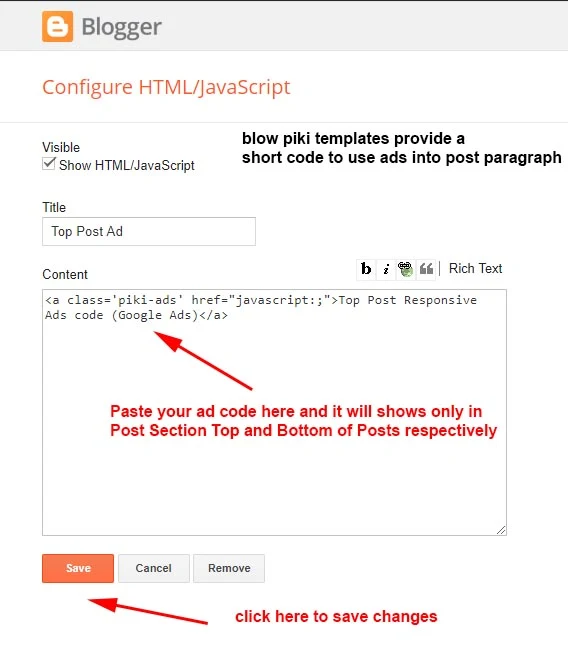
Use the Shortcode :- (ads1)
Note:- Use this Shortcut Code to display Custom ads from Top Section ad Gadgets to display in Posts Paragraph Remember this code only works if Top Posts Posts ad code and Bottom Posts ad code Section Added (make a strike on shortcode to work as below screenshot)
Post Author Social icons:
- Open Blogger Setting > then Choose Edit Blogger Profile > and paste ShortCode.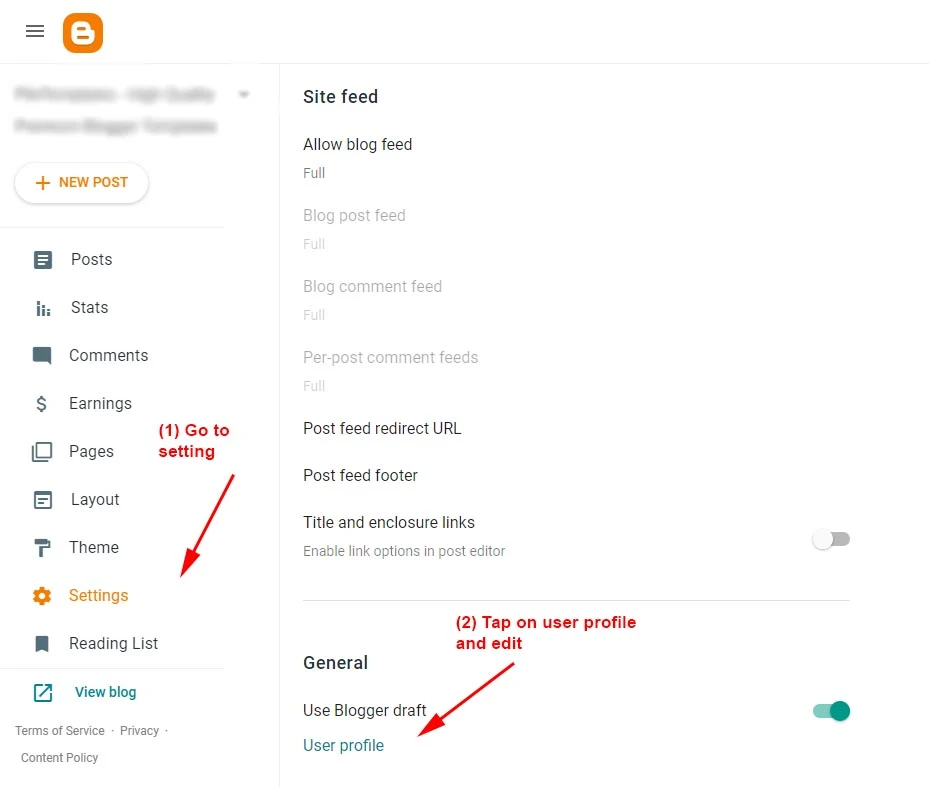
After editing Blogger Author Profile follow the below instructions provided in the screenshot
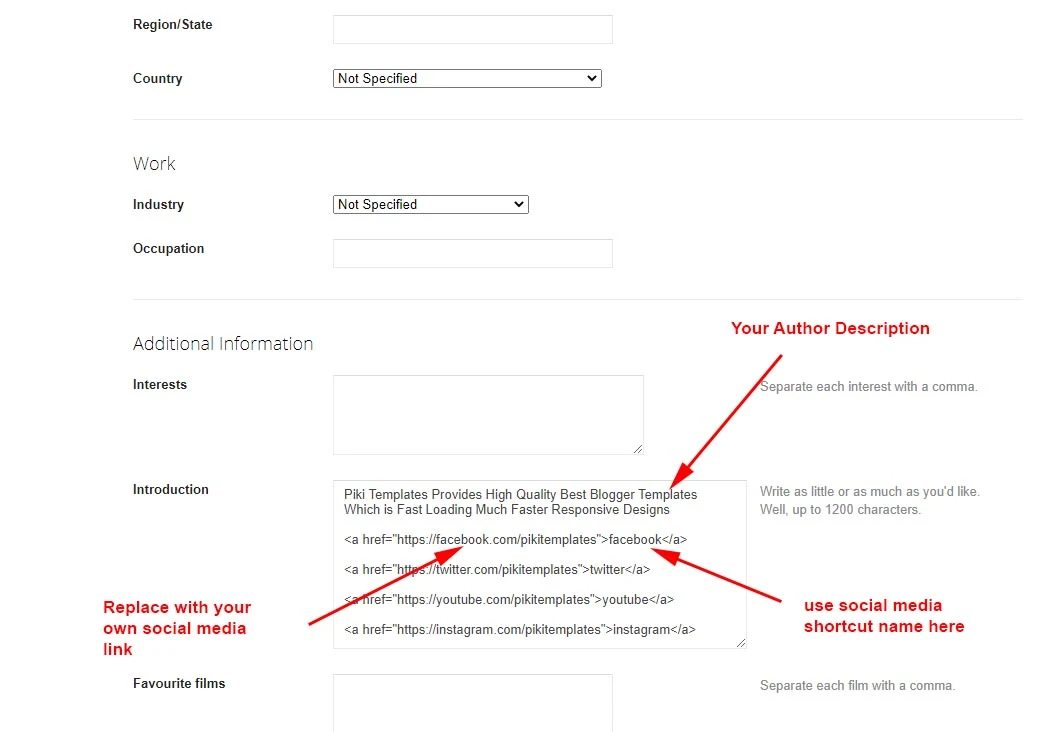
Here use the below shortcut code to display social media icons here
HTML Code :- <a href="Your Link Here">Icon Name</a>
HTML Example :- <a href="https://instagram.com/pikitemplates">instagram</a>
HTML Code :- <a href="Your Link Here">Icon Name</a>
HTML Example :- <a href="https://instagram.com/pikitemplates">instagram</a>
Social Icons :- This template support various social icons like facebook, whatsapp, instagram, pinterest, blogger, reddit, youtube, linkedin, twitter etc.
Facebook Page Plugin:
- Open Layout > then click on Add a Gadget HTML/Javascript > in Sidebar Section.Add this Short code :
<div class="fb-page" data-href="YOUR FACEBOOK PAGE URL" data-width="500" data-small-header="false" data-adapt-container-width="true" data-hide-cover="false" data-show-facepile="true"></div>
Note :- here in data-href Replace with your own link of your facebook page so install Facebook page on your template
Remember : This Facebook plugin works only if for both Facebook Page and Facebook Comment Box You have Installed below facebook sdk code in admin section follow below steps provided here

here you can add Facebook SDK Code to Show Facebook Comments in Template Also Turn of Facebook Comment System From Default Variables as shown in First Admin Section at top of documentation. Copy Code from below box and paste in Admin Section of Facebook Plugin gadget.
Facebook SDK en_US :
https://connect.facebook.net/en_US/sdk.js#xfbml=1&version=v8.0
Note :- Only this Sdk Code Shows both facebook page in sidebar and facebook comment box as you want to set on your blog
Testimonial Boxes:
- Open Layout > then click on Edit Icon > in the Testimonial Boxes (section) gadget.
Note:- All the Shortcut Codes Already installed and Provided with Template .
Brand Icons:
- Open Layout > then click on Edit Icon > in the Brand Icons (section) gadget.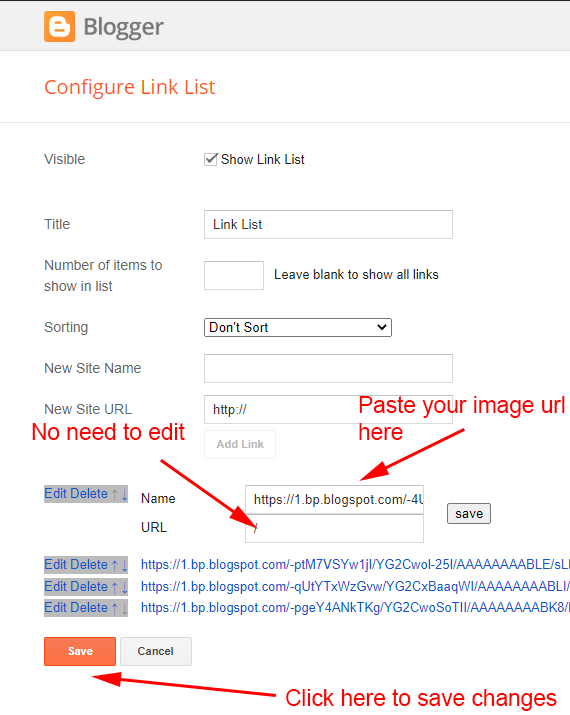
Note:- All the Shortcut Codes Already installed and Provided with Template .
Sidebar Section:
- Open Layout > then click on Edit Icon > in the Social Widget (section) gadget.
Here you can add a social media link in your sidebar by using shortcut code in LinkList Gadget as shown in the above image
Social Icons :- This template support various social icons like facebook,
whatsapp, instagram, pinterest, blogger, reddit, youtube, linkedin, twitter etc.
Other Sidebar Gadgets :- Open Layout > then Click on Edit Icon > and Select or Add a Gadget like Popular Posts, Follow by Email, LinkList, BlogSearch, Contact Form etc.
All the Features are Designed in this template you can use on your blog
Footer Contact List:
- Open Layout > then click on Edit Icon > in the Footer Contact List (section) gadget.Go the Link to Select Font Awesome Icon Code and use it on your blog
Here you can select Font Awesome Icon code to show like fa-asterisk paste in link box above in place of image.
Title can be Change from title boxes as above shown in image.
Note:- All the Shortcut Codes Already installed and Provided with Template .
Footer Social Media:
- Open Layout > then click on Edit Icon > in the Footer Section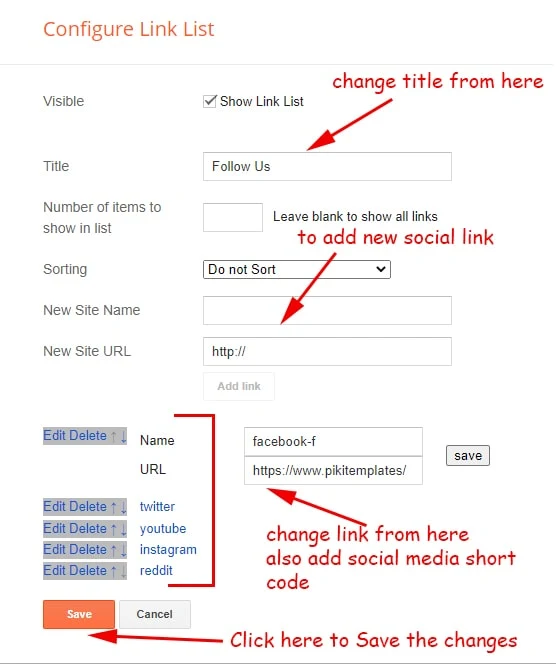
Here you can add social media icons to display on your blog links of social media display in Footer Section
Social Icons :- This template support various social icons like facebook, whatsapp, instagram, pinterest, blogger, reddit, youtube,
linkedin, twitter etc.
Footer Pages:
- Open Layout > then click on Edit Icon > in the Footer Menu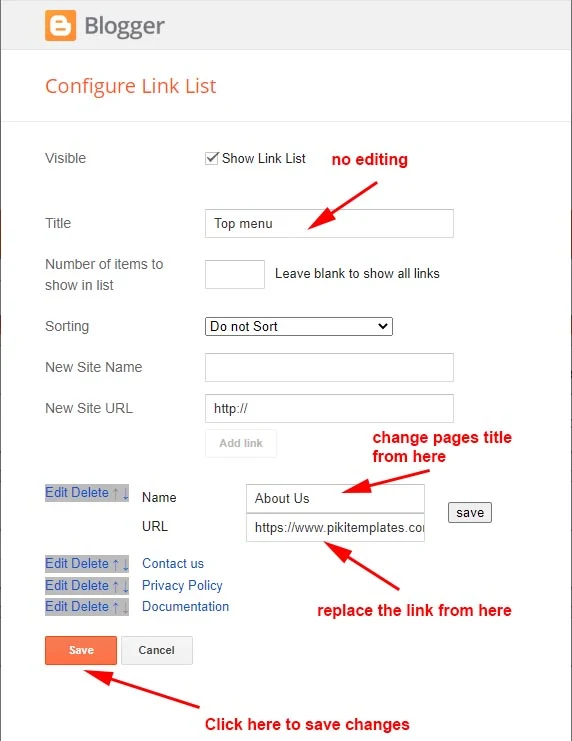
Turn Blog Feed " Full ":
- Open Blogger Dashboard > Tap on Settings then Scroll to Other > Site Feed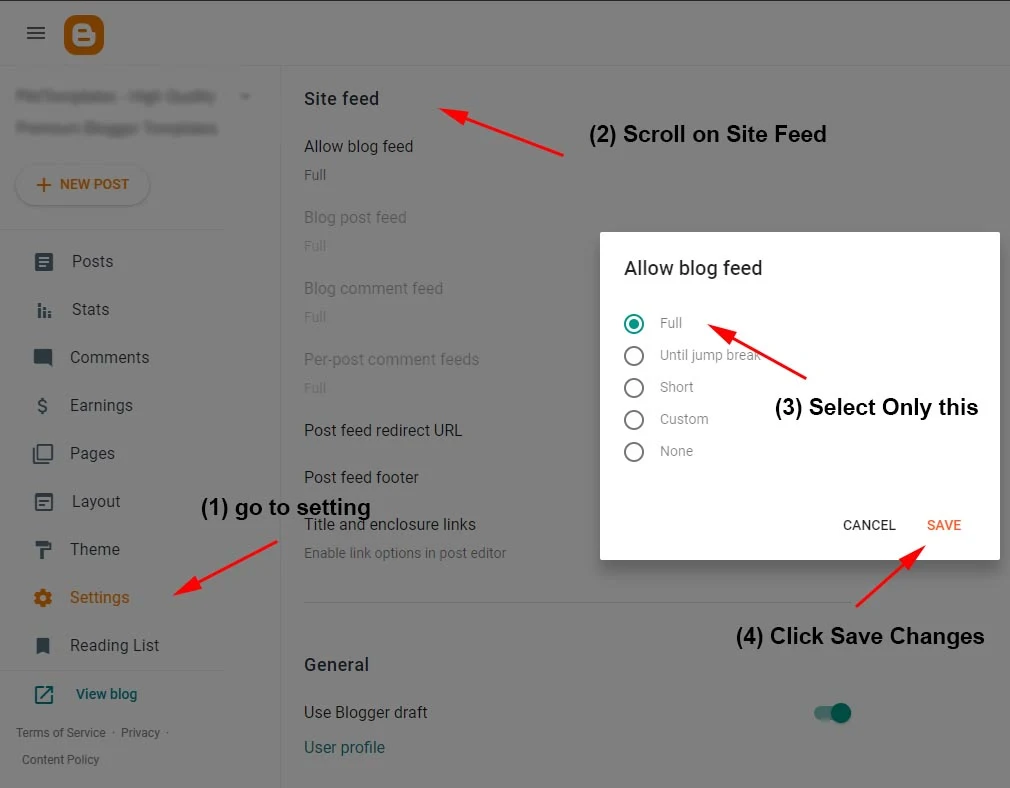
here by default Blog Site Feed is Always Full (Not Change to its Options)
Note:- Follow the instructions given here to turn on blog feed in full mode always.
in service box image link url not workijng. project box not show after adding gadget. No any update. What we do?
ReplyDeletePlease contact us sir, our team will help you.
Delete