
- V.5.7.0 (16 May 2025) - Added support for all social media icons (threads, x, mastodon, etc.) - 100 Score for Google Page Speed Test Tool (premium themes only) - Added Nofollow tag to labels /search URL (stop irrelevant signals) - Alt tag for author profile image fixed - Added new Schema tag for pages to better ranking (test with rich results) - H1 tag issue fixed posts, pages, including the homepage - New JS stylesheet for fonts and icons updated - SEO score improved for the Lighthouse test - Fixed featured post titles cut out in some languages - Use of the Theme Designer webpage lock fixed - Footer copyright is now flexible to handle long information - Minor colours, heights, forms and buttons fixed - V.5.1.0 (27 September 2024) - Fix significant text submenu words overlapping. - Fix hiding author name and photo blogger settings. - The H1 tag issue for "Page Speed Test" has been fixed. - Blank image from Layout now works all over sections. - Fixed hiding a section completely; it does not work in some sections. - Lazy Load and Native Feed improvements for speed. - Minor bugs were fixed, including the alignment and list buttons. - Updated (22 February 2021) - Added New Schema - Improved Shortcodes - Speed Enhancements - V.5.0.0 (12 December 2020) - Update New Script - Fix Minor Bugs - V.4.0.0 (04 December 2020) - Added Width Codes in Posts - Fix Minor Bugs - V.3.0.0 (02 October 2020) - Added New Table Box - Added Advance LinkList - V.2.0.0 (12 September 2020) - Update Breaking News - Fix Table in LinkList - V.1.0.0 (27 May 2019) - Initial Stage Release - Update Tables

How to Change FontAwesome Icons in Templates?
Get FontAwesome Icons Short Codes Visit Here. All the ShortCodes of Icons you can copy and use in below Link Boxes like Example : <i class="far fa-arrow-alt-circle-down"></i> Example:
Admin Control Panel:
To edit or handle the blog posts, comments system, no. of posts, fixed menu, Facebook SDK plugin, etc. These Options Can be Controlled from Layout in Blogger Dashboard.Facebook SDK (Plugin):
Here you can use this gadget to install the Facebook comment box and Facebook page in the sidebar. For More Click Here.Example of Facebook:

Note: Below in details, all important steps provided for setup Facebook Comments System/Facebook Page on sidebar
Default Variables/Comments:
Open Layout > then click on Edit Icon > in the Default Variables gadget.Example:

Example to set Disqus Comment box:

Use below shortcut code: commentsSystem = facebook or disqus or blogger
disqusShortname = pikitemplates
noThumb = image url
You can use Disqus comment box a optional feature of our template, Just go to disqus.com create account after that tap on Get Started and follow "I Want to install Disqus on my Site" as shown in above image how to setup shortname for disqus. That's done just change blogger comment system and use disqus comments pluign easily Example of Disqus Comment:

Note: Many Users Facing Problem adding Disqus Comment Box make sure you
have added website link and created profile short name in Disqus.
Related Posts/ Show Texts:
Open Layout > then click on Edit Icon > in the Related Posts/ Email text gadget. Example:
Example of Related Posts:

relatedPostsNum = 3 - you can set number of Related Posts
loadMorePosts = Load More - you can change Load More Homepage button text
Example of Load More text:

Note: Use only Lowercase(small letters) letter in shortcode as display in above image.
Lazy Scrolls/ More Text:
Open Layout > then click on Edit Icon > in the Lazy Scrolls/ More Text gadget. Example:
fixedMenu = true or false - you change sticky menu fixed to scrolled
showMoreText = Show More - you can easily change Show More text in Featured Posts
Note: Use only Lowercase(small letters) letter in shortcode as display in above image.
Top Main Menu:
Open Layout > then click on Edit Icon > in the Top Main Menu (section) gadget. Example:
All the Top main menu items are easy to edit and manage from layout as shown in above image to you understand properly, remeber to use correct format as ahown in above image
Note: All the Shortcut Codes already installed and provided with template .
Top Social Media:
Open Layout > then click on Edit Icon > in the Top Social Media (section) gadget. Example:
All the Top Social Media items are easy to edit and manage from layout as shown in above image to you understand properly, remeber to use correct format as ahown in above image
Note: All the Shortcut Codes already installed and provided with template.
Note: here in href replace with your own link of your social media links on your template
Main Logo:
Open Layout > then click on Edit Icon > in the Main Logo (Header) gadget. Example:
Here you can change your blog main logo click on upload option to use your new logo, and try to compress your logo (there're various online image png compression tools available) compression can help you to boost up your website speed.
For Dark Logo: You can upload dark logo easily, first of all upload dark image in post and copy img source link and then paste in link box as shown in above image.
Note: You can also use optional Dark Logo in Link Box just paste the logo image url.
Main Menu:
Open Layout > then Click on Edit Icon > in the Main Menu gadget. Example: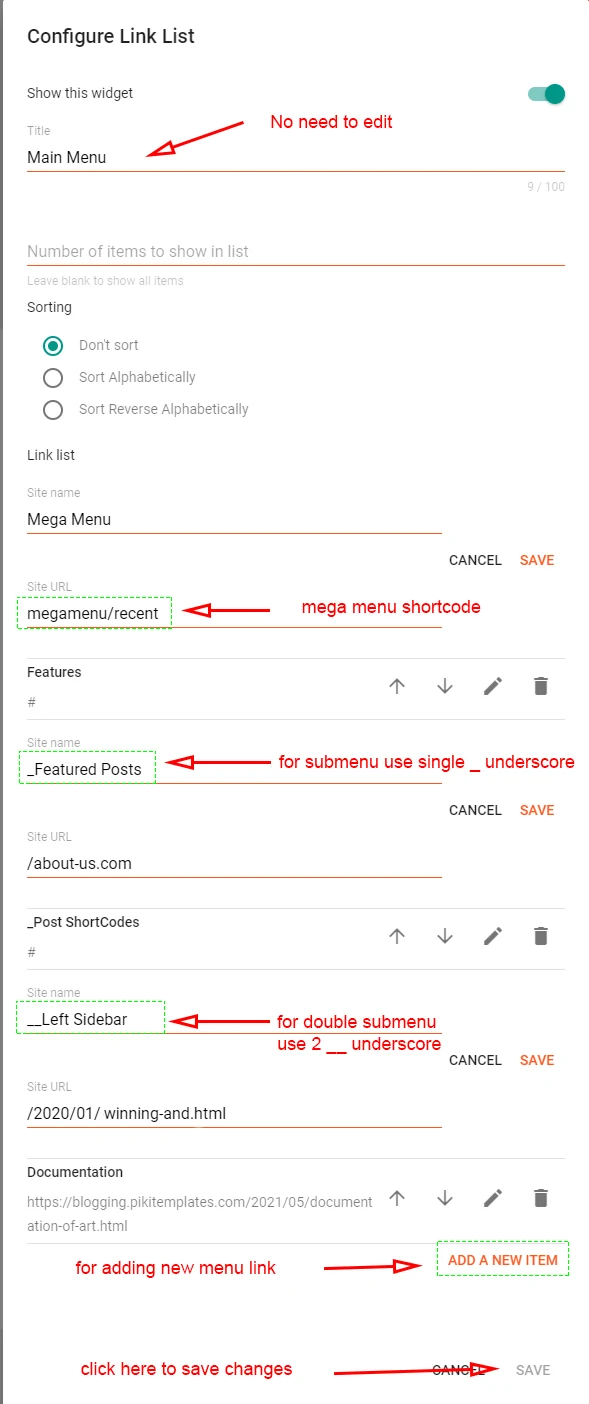

Sub-Menu Example = _Level 1 - just add 1 underscore before title
Double Sub-Menu Example = __Level 2 - just add 2 underscore before title
Note: Use single (_) underscore for sub menu and double underscrore (__) for double sub menu.
For random posts = megamenu/random - this shortcode shows random posts
For specific label = megamenu/Your Label - this shortcode shows custom label posts
Note: Use the correct shortocde as shown in above image, Use lable name same exact as in posts either in Lowercase or Uppercase.
Breaking Posts:
Open Layout > then click on Edit Icon > in the Breaking Posts (section) gadget. Example:

Here you can use this section to display Responsive Feature with both label and Recent Shortcut Code
Note: All the Shortcut Codes already installed and provided with template .
For random posts = 6/trending/random - this shortcode shows random posts
For specific label = 6/trending/Your Label - this shortcode shows custom label posts
Note: Use the correct shortocde as shown in above image, Use lable name same exact as in posts either in Lowercase or Uppercase.
Featured Posts:
Open Layout > then click on Edit Icon > in the Featured Posts (section) gadget. Example:

Here you can use this section to display Responsive Feature with both label and Recent Shortcut Code
Note: All the Shortcut Codes already installed and provided with template .
For random posts = 6/col-left/random - this shortcode shows random posts
For specific label = 6/col-left/Your Label - this shortcode shows custom label posts
Note: Use the correct shortocde as shown in above image, Use lable name same exact as in posts either in Lowercase or Uppercase.
Main Featured Posts Section:
Open Layout > then click on Edit Icon > in the Main Featured Posts Section gadget. Example: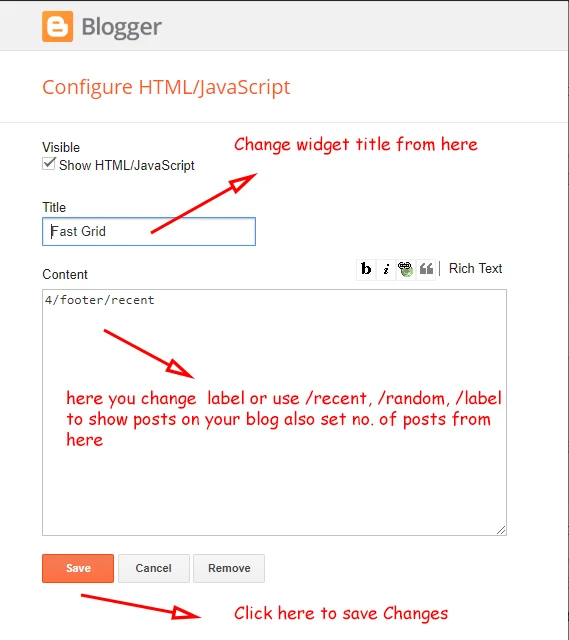
Here you can use this section to display Responsive Feature with both label and Recent Shortcut Code
Note: All the Shortcut Codes already installed and provided with template .
Note: You can use /random, /recent /Your Label as you want to show posts on your website.
Main Recent Posts:
Open Layout > then click on Edit Icon > in the Main Recent Posts (section) gadget. Example: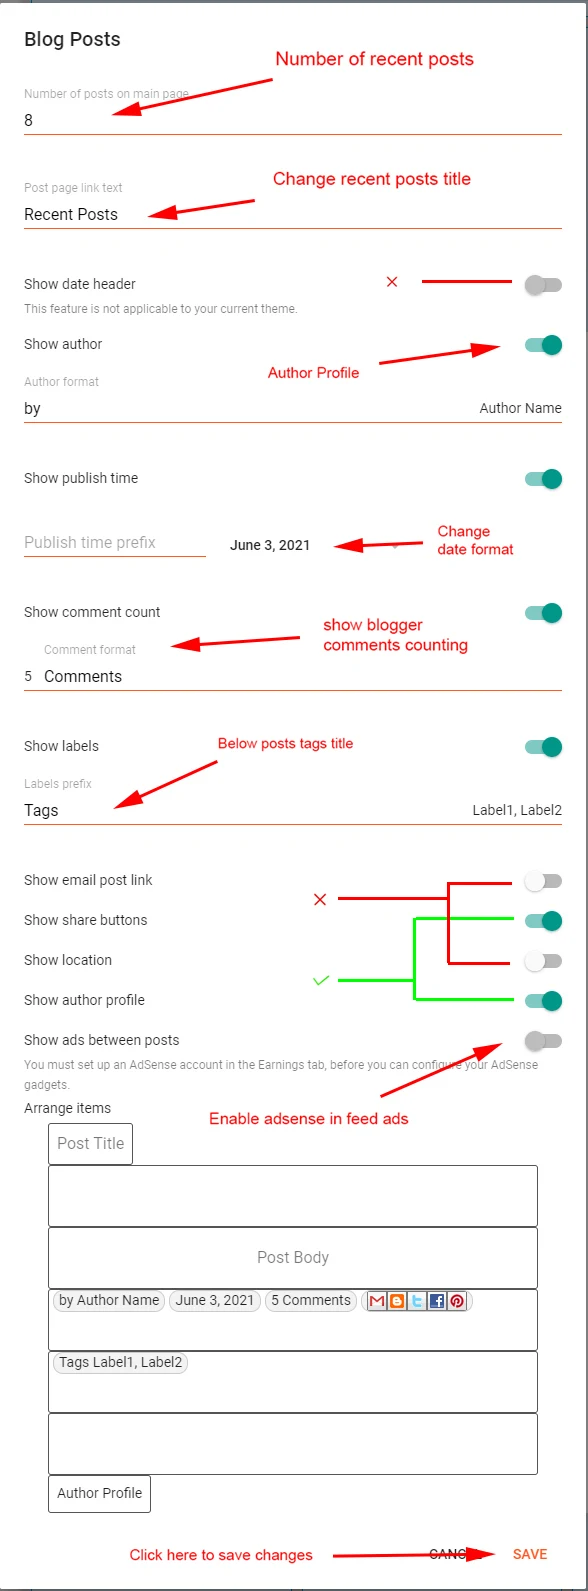
Note: Once your Adsense account approved you can show ads between posts, also manual ads can be place
Inside Posts Ads:
Open Layout > then click on Edit Icon > in the Top / Bottom Posts Ad (section) gadget. Example: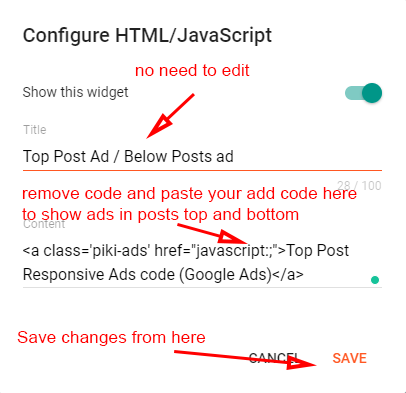
Note: Top/Bottom Posts Ads Gadget helps to show ads at top and bottom of page
Post Paragraph Ads :
Open Post > then Choose area in Post > and paste ShortCode. Example: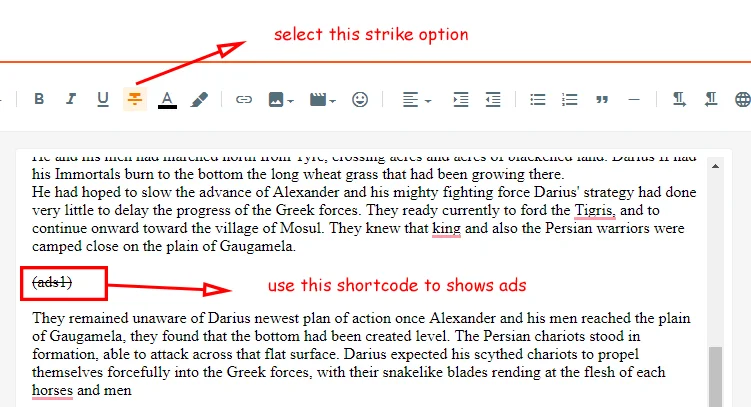
Bottom Posts ads shortcode = (ads2) - this shortcode can be used to shows ads in specific place in post
Note: Remember to put ads code into Layout in Top/Bottom Ads code Section Gadget.
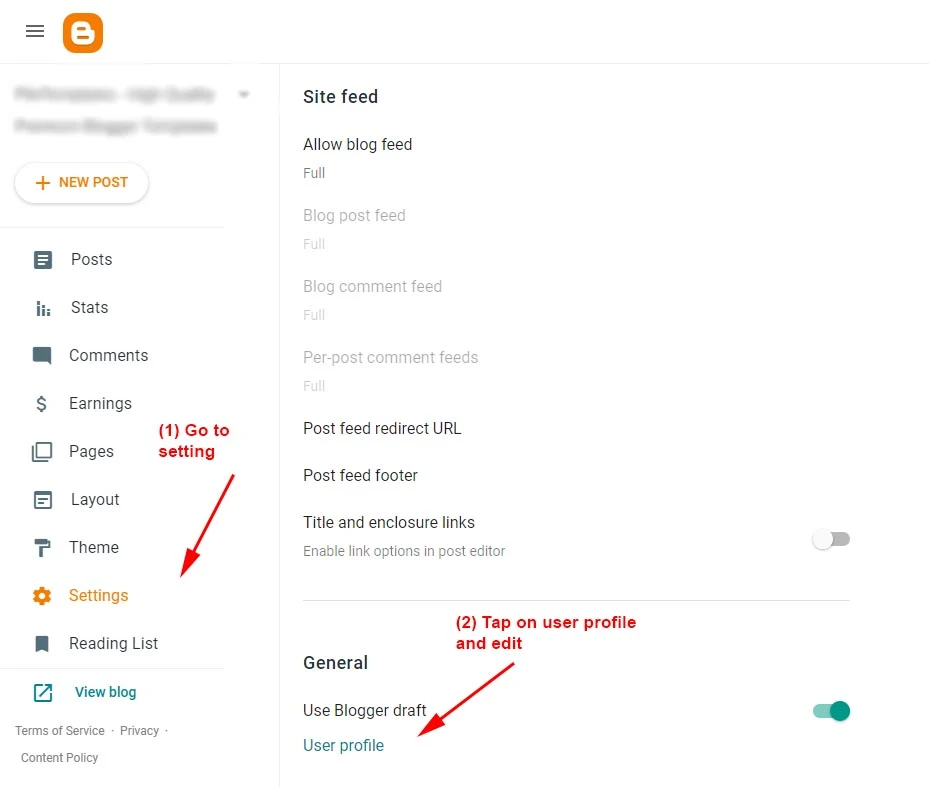
Post-Author Social icons:
Open Blogger Setting > then Choose Edit Blogger Profile > and paste ShortCode. Example:
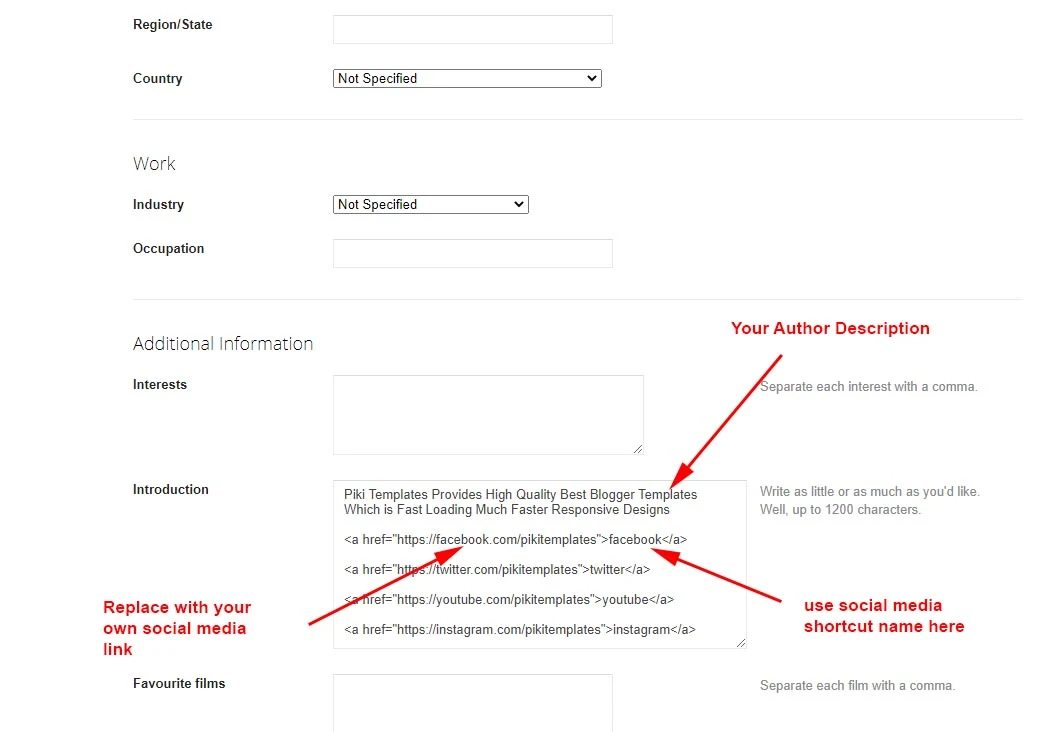
Add this Short code :
Hello this is Jane Doe, I am Web Designer and Expert at Piki Templates<a href="https://facebook.com/pikitemplates">facebook</a><a href="https://twitter.com/pikitemplates">twitter</a><a href="https://youtube.com/pikitemplates">youtube</a><a href="https://instagram.com/pikitemplates">instagram</a><a href="https://www.pikitemplates.com/">external-link</a>Note: here in href replace with your own link of your social media links on your template
Facebook Page Plugin:
Open Layout > then click on Add a Gadget HTML/Javascript > in Sidebar Section. Add this Short code :<div class="fb-page" data-href="YOUR FACEBOOK PAGE URL" data-width="500" data-small-header="false" data-adapt-container-width="true" data-hide-cover="false" data-show-facepile="true"></div>
Remember: This Facebook plugin works only for both Facebook Page and Facebook Comment Box you have to Installed below facebook SDK code in the admin section follow below steps provided here
Note: here in data-href Replace with your own link of your facebook page so install Facebook page on your template
Facebook Comment Plugin:
Open Layout > then click on Edit Icon > in Facebook SDK (Plugin) > in Admin Section. Example:
https://connect.facebook.net/en_US/sdk.js#xfbml=1&version=v8.0
Note: Only this SDK Code Shows both facebook page in sidebar and facebook comment box as you want to set on your blog
Sidebar Section:
Open Layout > then click on Edit Icon > in the Social Widget (section) gadget. Example:
Social Icons: This template support various social icons you can use as per your requirement, use only Lowercase characters.
Sidebar Posts Section:
Open Layout > then click on Edit Icon > in the Most Loved Section gadget. Example: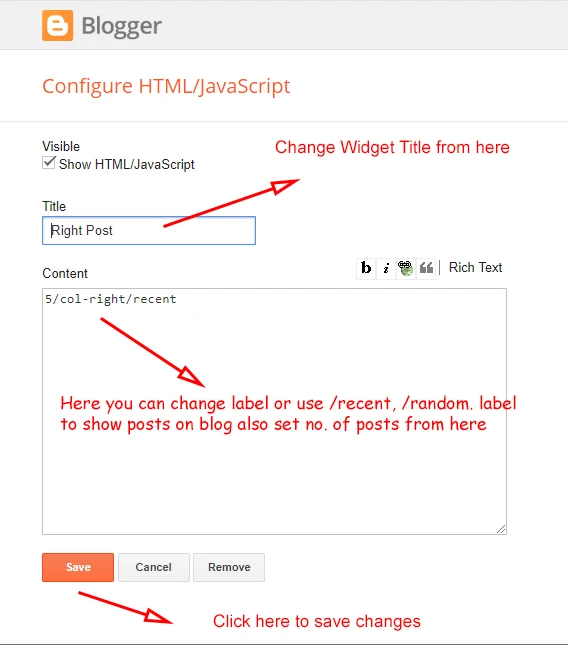
For random posts = 4/col-left/random - this shortcode shows random posts
For specific label = 4/col-left/Your Label - this shortcode shows custom label posts
Note: Use the correct shortocde as shown in above image, Use lable name same exact as in posts either in Lowercase or Uppercase.
Sidebar Comments Section:
Open Layout > then click on Edit Icon > in the Comments Section gadget. Example:
Note: Use the correct shortocde as shown in above image, Use lable name same exact as in posts either in Lowercase or Uppercase.
Footer Social Media:
Open Layout > then click on Edit Icon > in the Footer Section Example: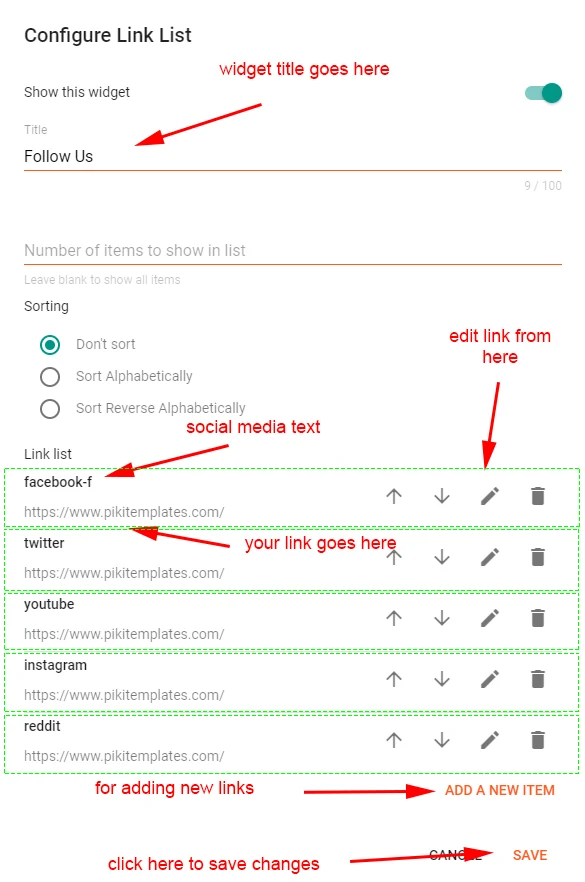
Note: here in href replace with your own link of your social media links on your template
Footer Pages:
Open Layout > then click on Edit Icon > in the Footer Menu Example: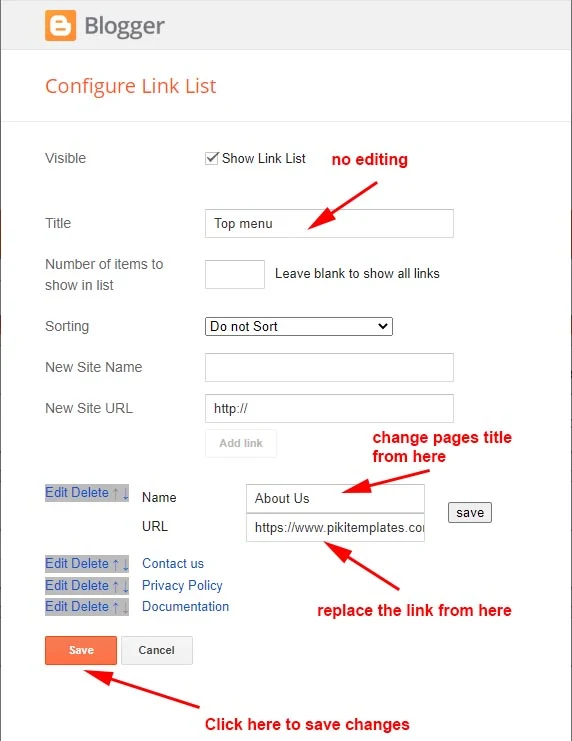
Note: All the Shortcut Codes already installed and provided with template .
Footer Copyright:
Open Layout > then click on Edit Icon > in the Footer Copyright Example: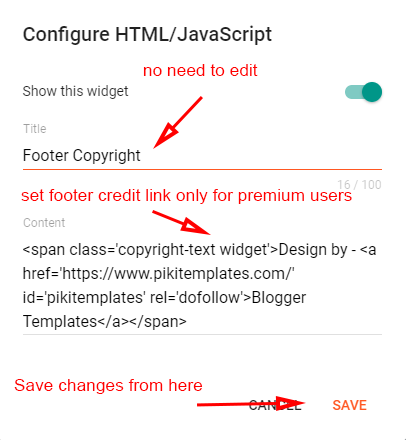
Note: Only premium users can edit and remove, free users cannot remove our website link.
Turn Blog Feed " Full ":
Open Blogger Dashboard > Tap on Settings then Scroll to Other > Site Feed Example: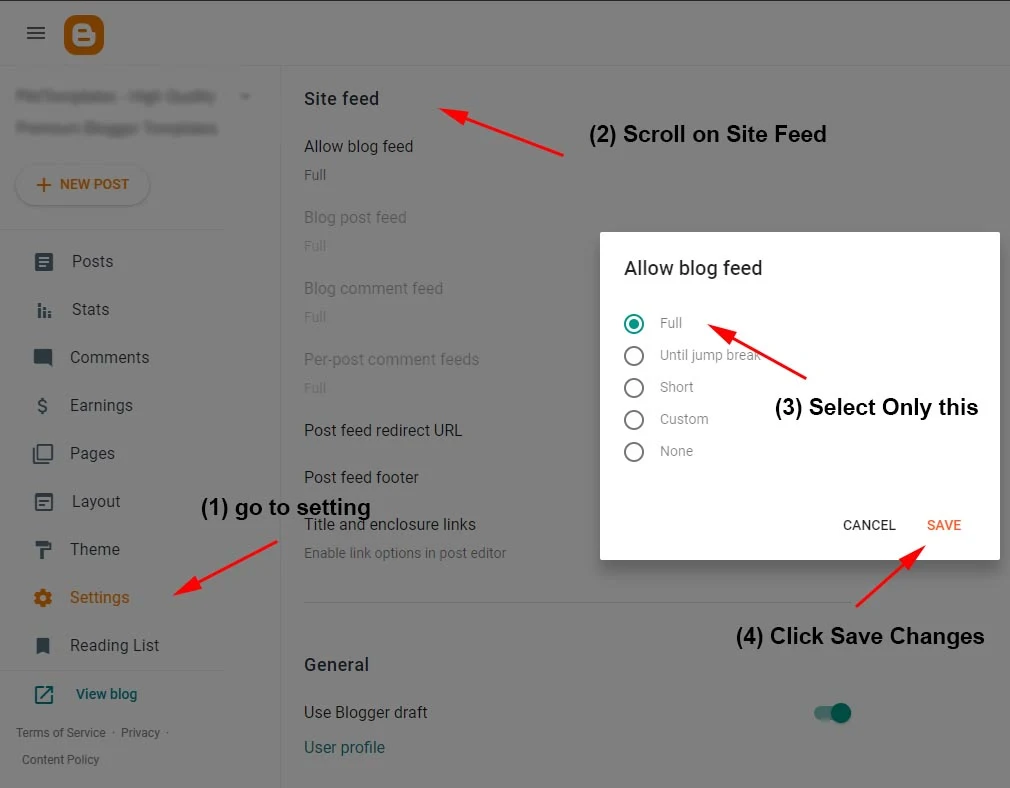
Note: Follow the instructions given here to turn on the blog feed
in full mode always.
Is it one time payment or I will be charged monthly if I purchase this theme?
ReplyDeleteOne time Purchase only Sir
Deletehow to create table?
ReplyDeleteUse html table generator to use table or contact us at pikitemplates@gmail.com
DeleteHow to add Adsense ads on the right sidebar of this template?
ReplyDeleteCopy ad code from your AdSense dashboard and click add a widget then select HTML/JavaScript gadget and paste
Deletehow to change post tittle size?
ReplyDeleteGo to theme designer sir.
DeletePlz update piki movie with new shortcode v2.0.0
ReplyDeleteWe have provided our relevant updates to Piki movie template.
DeleteFeture post left & right problem
ReplyDeletePlease share problem through email so that we can check it.
Deletethanks for the template.
ReplyDeleteYou are very welcome
Delete